Board Game Tutorial
In this tutorial, you are taught the steps for making a VASSAL module for an example board game called Zap Wars. All data for this tutorial is in the ZapWars.zip file (click the link to be taken to the download page for the ZIP file).
First, launch VASSAL. This opens a VASSAL window listing available game modules.
- In the File menu, select ```New Module```. This opens 2 new windows: An ```Unnamed module``` window, and a Module Editor window.
- In the ```Module Editor``` window, right-click on the first list item, ```Unnamed module [Module]```, and select Properties. In the Unnamed module window that appears, type Zap Wars into the Game Name [ModuleName] field, and then click OK.
- In the File menu of the Module Editor window, select Save. This warns you that you have not defined a Main Map yet, but for now click Ignore, save anyway and save the module to your hard drive.
- Any time you need to resume working on your module, select Edit Module from the VASSAL window's File menu, and then select the .vmod file you just saved.
Maps, Boards, and Grids
Zap Wars includes a strategic-level component and a tactical-level component. Each of these are represented by a Map Window in VASSAL. A VASSAL module comes with one Map Window by default.
Zap Wars requires a tactical map.
- In the Module Editor window, double-click the Main Map [Map Window] list item to open the ```Main Map``` configuration window.
- In the Main Map window, type Tactical Display in the Map name field.
- Set both the Horizontal padding and Vertical padding values to ```150```. This preserves some blank space around the map you are creating.
- The map for Zap Wars uses a black background, so click the colour swatch next to Border color for selected counters and choose a border color (such as a light green) for highlighting a selected game piece.
- The tactical map isn't the main playing area in Zap Wars, because it's only used when the strategic situation of a game dictates a battle. Click the checkbox next to Include toolbar button to show/hide option. This reveals new options.
- In the Button text field, type Tac.
- Place your cursor in the Hotkey field and press CTRL-SHIFT-T on your keyboard. When the game is running, players can use the keyboard shortcut CTRL-SHIFT-T to bring up the tactical window.
- Click the OK button at the bottom of the Main Map window to save your changes and close the window.
A Map Window must contain at least one board. To add a board to the Map Window, click the disclosure triangle next to the Main Map [Map Window] list item in the Module Editor window, and then double-click the [Map Boards] list item, or right-click Map Boards and select Add Board.
- In the Map Boards window that appears, type Tactical grid in the Name field.
- The tactical map image provided in the Zap Wars ZIP file has 41 squares in both directions, with each square being 50 pixels on each side. 41×50 is 2050. Add 1 pixel for the grid boundaries, for a total of a board size of 2051 pixels. Type 2051 in the Board width and Board height fields.
- Set the background color to black.
- Click the OK button to save your changes and close the window.
It's common for games to use a grid to regulate movement. Rather than constructing a map cell by cell, VASSAL defines a complete board and then superimposes a grid onto it.
- Click the disclosure triangle next to the the Map Boards list item (under Main Map [Map Window]).
- Right-click the Tactical [Board] list item, and select Add Rectangular Grid.
- In the Rectangular Grid window that appears, set X offset and Y offset to 25, and the Cell width and Cell height to 50.
- Click the checkbox next to Show Grid to make the grid visible, and set Color to white.
You've added a grid to your tactical map, so now there's a new list under Tactical [Board] in the Module Editor window. Click the disclosure triangle to confirm that your tactical map contains a [Rectangular Grid] item.
- You can assign a numbering scheme to the grid. Right-click the [Rectangular Grid] list item and select Add Grid Numbering from the contextual menu. In the Grid Numbering window that appears, there are configuration options for your board's grid. The numbering scheme is used when reporting the movement of units.
- In Zap Wars, the tactical grid cells are numbered x,y with 0,0 in the center.
- Type , (a comma) in the Separator field.
- Set Leading zeros in horizontal to 0.
- Set Starting number horizontal to -20.
- Set Leading zeros in vertical to 0.
- Set Starting number vertical to -20.
- Numbers can also be drawn directly on the grid so a player can use them as reference. Click the checkbox next to Draw Numbering to enable visible numbers on the grid, and set the color to white.
- Click the OK button to save your changes and to close the window.
You've now defined your first VASSAL map!
Select Save in the File menu of the Module Editor window to save your work, and then select Quit so you can launch and test the game so far.
View your work
To check your work, you must interact with your module as a player. When someone downloads your VASSAL module, they open the module in VASSAL, and are presented with a setup window.
- In the VASSAL window, double-click your Zap Wars module in the module list, or select Open Module from the File menu and open your module.
- In the Welcome setup screen, click Finish, accepting all default options.
- Before the game launches, you're given the option to start a log file. When developing a game module, logs are a valuable source of information about what's happening in the background of the game, so click Yes and create a log file in your development directory.
- In the Enter File Comments dialogue box that appears, type First test session and click the OK button.
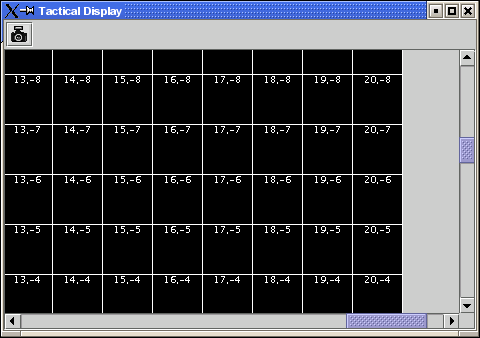
In the LOGGING window, click the Tac button in th top toolbar to open a map window.
The window has a toolbar with a camera button, which enables you to capture the entire map to a graphics file in the PNG format. Exporting a blank grid can be a good way to get the layout of your board when you're drawing your own map by hand.
Now that you've confirmed that your first map can be displayed, close the tactical map window. Select Quit from the File menu to stop the running instance of the game.
Add a second map
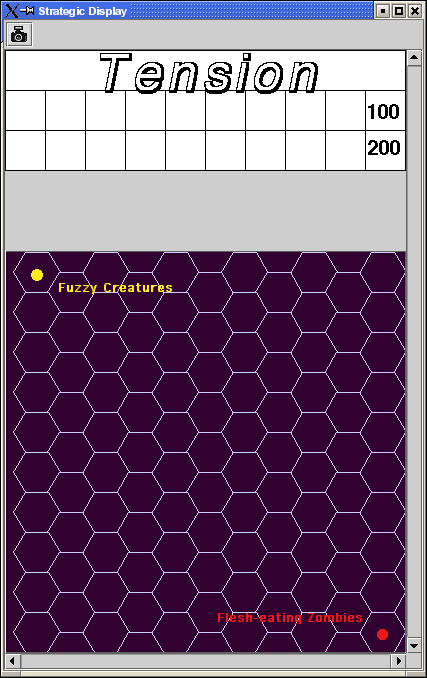
The main playing area for Zap Wars is the strategic map plus a Tension track. For both of these, we'll use pre-defined artwork. The ZapWarsData folder contains a Strategic.gif and a TensionTrack.gif file. Right-click on the Zap Wars module component in the editing window and select "Add Map Window." Name the window "Strategic Display". Again set the border highlight color to green. This time, we'll leave the "Include Toolbar" button unchecked. This will cause the Strategic map window to always be visible during a game. We'll also check the "Can contain multiple boards" box.
The Strategic map and Tension Track will each be a separate board that are combined in the window. Expand the Strategic Display component, right-click on the Map Boards component, and select "Add Board". For the board image, hit the "Select" button and select the Strategic.gif file. Do the same for a second board and the TensionTrack.gif file.
The Strategic and Tension Track boards have map grids included in their artwork. We will still add grids to them to regulate placement of units, but we will leave the "Show Grid" boxes unchecked. The Strategic board grid takes a hex grid with "Y offset" 33, "X offset" 22, and "Hex Height" 40. The Tension Track takes a rectangular grid with "Y/X offset" 20 and "Cell Width/Height" 40. In practice, you'll want to check the "Show Grid" box and start a new game in order to tweak the values of the grid to correspond with the artwork and then uncheck the "Show Grid" box when they're correct.
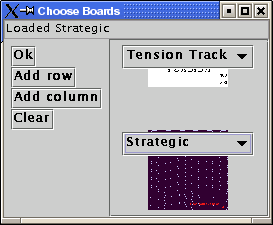
In the main map window, the Tension Track should go above the strategic map. Double-click on the Map Boards component of the Strategic Display component and hit the "Select Default Board Setup" button. You'll get a dialog for arranging the boards in the window. Hit the "Add Row" button to place two boards on top of one another. In the top slot, select the Tension Track board from the drop-down menu, and select the Strategic board in the second slot.
Now, whenever a new game is started, the Strategic Display window will come up with these two boards. If you don't select any default board setup (i.e., if you hit the "Clear" button), then the Choose Boards dialog will be shown to the player when starting a new game.
That completes the definition of the maps in our Zap Wars module. During play, players will drag pieces from the Strategic display to the Tactical display to complete their battles, then drag them back to the Strategic display when finished.
Counters
VASSAL gives you two ways to use game pieces in a game. A Game Piece Palette is a window organized with tabs and menus from which you may drag an unlimited number of each kind of piece onto a map. A Deck is a fixed pool of counters from which players may draw (in order or randomly) such that each piece is removed from the Deck once drawn by a player. We will use a Game Piece Palette for this tutorial. You'll find artwork for the counters in the ZapWarsData folder
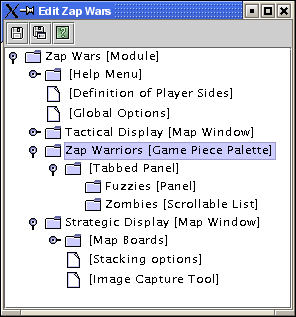
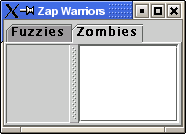
Game Piece Palette Structure: By default, each module is configured with a single Game Piece Palette. First, we'll define the basic structure of the Game Piece Palette. We'll create two tabs: one for each side, the Fuzzy Creatures and the Flesh-Eating Zombies. The Fuzzies tab will have two different pieces while the Zombies tab will have a scrollable list of different pieces. Double-click on the Game Piece Palette component and enter "Zap Warriors" for the name. This will be the name of the window containing the pieces. Right-click on the Zap Warriors component and select "Add Tabbed Pane." The name of the Tabbed Panel can be ignored. Right-click on the new Tabbed Panel component and select "Add Panel". Set the name to Fuzzies and the number of cells to 2. Right-click again on the Tabbed Panel and select "Add Scrollable List," naming it "Zombies." Now push the "Zap Warriors" button in the controls window toolbar to see the window.
A Basic Piece: The simplest piece in VASSAL consists of a single image. Right-click on the "Fuzzies" panel component and select "Add Single Piece." You'll be presented with VASSAL's dialog for building Game Pieces. Double-click on "Basic Piece" in the "Current Traits" list on the right. Set the Piece name to "Base". Double click on the box and select "FuzzyBase.gif" in the tutorial directory. Hit "Ok" at the bottom and you'll see the piece appear in the "Fuzzies" tab. The "FuzzyBase.gif" image uses transparency to give it a shape other than a square.
Rotation: VASSAL lets you design your pieces by selecting from a list of traits. Each piece will have only the traits you need. One of the most common traits is the ability to rotate. Right-click on the "Fuzzies" panel node and select "Add Single Piece" again. This time we'll add the warship, which has multiple facings. Set the name to "Warship." In the "Basic Piece" properties, select "FuzzyShip.gif" as the base image. Now select "Can Rotate" in the "Available Traits" and hit the "Add" button to add that trait to the piece. Let's suppose that the game allows 8 possible facings on the square tactical grid. Fill in that number for the number of allowable facings and leave the other fields unchanged.
You can test your counters without having to drag them onto a map. In the main piece definition dialog, you can right-click on the counter at the top of the window to bring up the piece's popup menu, or select the piece and type. You can do the same with the piece in the Game Piece Palette. When you select the Fuzzy warship and type CTRL-] and CTRL-[, the piece will rotate clockwise and counterclockwise.
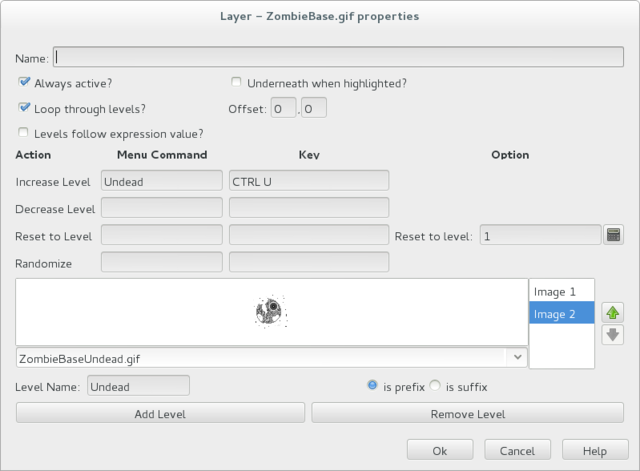
Layers: Layers are the most common way of adding functionality to a piece in VASSAL. A Layer is a set of images drawn on top of the basic piece. The user can turn on/off the images and cycle through them with key commands. The Zombie base has two states: normal and Undead. Right-click on the Zombies scrollable list component and select "Add Single Piece." This time, leave the Basic Piece properties unchanged. Select "Layer" from the available traits and hit the "Add" button. Each image that can be cycled through in a Layer is called a Level. We need two levels: one for each state. One of the two levels will always be drawn, so select the "Always active" box. Pick "ZombieBase.gif" for Image 1, then hit the "Add Level" button and select "ZombieBaseUndead.gif" for Image 2. The Increase/Decrease commands are what the players use to cycle through the levels. Since there are only two levels, we don't need both commands. Change the "Increase" command to "Undead" and the key to CTRL-U. Now when players select a Zombie base and hit CTRL-U, the base will toggle between its normal and Undead states. If we set the name of level 2 to "Undead" and check the "is prefix" button, then when the Undead level is activated, the name of the piece (used in autoreporting moves) will be "Undead Zombie Base" rather than simply "Zombie Base."
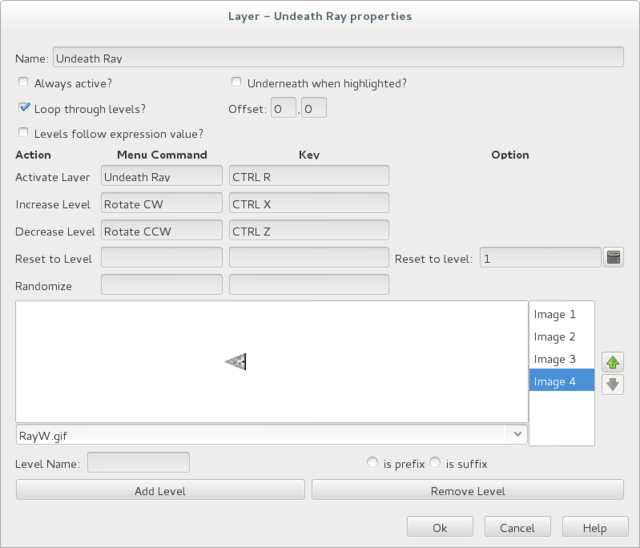
Advanced Layers: When a Zombie unit is in its Undead state, it can activate its Undeath Ray, directed either up, down, or to either side. We'll add a second Layer to the Zombie Base to represent the Undeath Ray. Select "Layer" again from the list of available traits and hit the "Add" button. Give the Layer four levels using the images RayN.gif, RayE.gif, RayS.gif, and RayW.gif. Note that these images also use transparency to offset the depiction from the center of the counter. The Increase/Decrease commands will change the facing of the ray. Set the "Increase" command name to "Rotate Ray CW" and the "Decrease" command name to "Rotate Ray CCW." Set the keys to CTRL-X/CTRL-Z so as not to conflict with the commands to rotate the ship. The Activate command will show or hide the depiction, so we set the "Activate" command name to "Undeath Ray." For the Activate key command, a simple CTRL-R would toggle the depiction on/off whenever the player selected the counter and typed CTRL-R. We can instead specify that the layer can only be activated in the Undead state by specifying the key to be CTRL-RU, which means that the player must type both CTRL-U (which we have also named as the key to activate the Undead status layer) and CTRL-R to activate the layer. (Luster: I could not bind CTRL-R-U in VASSAL 3.2.9)
Copy/Paste: The Zombie Warship looks similar to the Base except that the ship can change facing. You can save a lot of time defining counter by usingC the Copy/Paste commands in the edit window. Right-click on the Zombie Base component and select "Copy" then right-click on the Zombies scrollable list component and select "Paste." Now we need only edit the copy and change a few things. Edit the Basic Piece properties and change the name to "Zombie Warship". Edit the properties of the first Layer, select "Image 1," double-click on the image, and select the ZombieWarship.gif file.
Partial Rotation: The order of traits in a piece is important. Generally, a trait can modify only those other traits that appear before it in the list. Edit the Zombie Warship and add a "Can Rotate" trait. Then select it and push the "Move Up" button until it is between the two Layer traits. This will make the Zombie Warship depiction rotate without making the Undeath Ray depiction rotate.
Invisibility and Masking: The "Invisible" trait allows a player to completely hide a counter from another player. The Mask trait allows one player to hide details of a counter from another player. The Zombie Minefield will make use of both of these traits. Add another Single Piece to the Zombies component. Leave the Basic Piece image blank and set the name to Minefield. Add a Layer with 3 levels, using the mine6.gif, mine8.gif, and mine12.gif images. Add a "Mask" trait. Set the Mask command to "Reveal" and the key to CTRL-R. Set the "view when masked" to the mine.gif image. The fuzzy player will see only this image until the minefield is revealed. The display option determines how the Zombie player will see the counter. We'll select the Inset style, which displays the masked image in the upper left corner as a reminder to the Zombie player that the piece is not revealed. Finally, add the Can be Invisible trait. When activated, the counter will be completely invisible to the Fuzzy player. The zombie player will see a transparent version of the piece against a colored background. Select black for the background color. The Zombie player can make the piece invisible and masked in the Game Piece Palette before dragging it onto the map.
Prototypes: Prototypes are a way of allowing many pieces to share a common set of traits. In Zap Wars, every Zombie unit has the Undeath Ray capability. While Copy/Paste can be used to create the units initially, it can be difficult to manage if the module author later decides to make some alteration that affects many different pieces. Right-click on the "Module" folder and select "Add Game Piece Prototype Definitions" if one does not already exist. Right-click on it and select "Add Definition." The dialog for defining a Prototype is the same as the one for defining a Game Piece, but with a name, and without the innermost Basic Piece. Define an "Undeath Ray" layer just as it exists in the Zombie Base and Warship. Name the Prototype "Zombie." Now edit the Zombie Base and Warship and replace the Undeath Ray layer with a "Prototype" trait, using the name "Zombie." Now other ship types may be added that use the same prototype. The Undeath Ray layer can be adjusted later, affecting all of the units at once. Furthermore, a new trait may be added to all pieces at once by simply adding the new trait to the Prototype definition.
Module Extensions
We continue with a demonstration of how to create optional module extensions. Assuming you have named your module file "ZapWars.mod" when saving it, then VASSAL will look in a folder named "ZapWars_ext" for extensions automatically when loading a module for play. Begin by creating the ZapWars_ext folder in the same location as the ZapWar.mod file.
You may only edit one module or one extension at a time, so if you are still running VASSAL, exit and restart. Hit the "Load Module" button and select ZapWars.mod. The module will be loaded as if you were playing it. Now hit the "New" button in the "Extensions" panel. You will get an editing window just like when editing a module. The difference is that you may not modify any components in the original module. You may only add new components.
The extension we will define adds planetary terrain. Save the extension to a file named "terrain.mdx" in the ZapWars_ext folder. Our extension adds a new tab to the Game Piece Palette containing some new kinds of pieces. Right-click on the Tabbed Panel component and add a new scrollable list named "Terrain." Right-click on the Terrain component and add a new piece. In the Basic Piece properties, name it "Asteroid" and select "asteroid.gif" for the image.
Non-stacking pieces: Our terrain markers should naturally not form stacks with other pieces, so we will add the "Does not Stack" trait to the Asteroid piece. Since the terrain markers also do not generally move once placed, we will select the "when shift-key down" option for Select piece and "only if selected" option for Move piece. This allows player to move them but prevents them from doing so inadvertently.
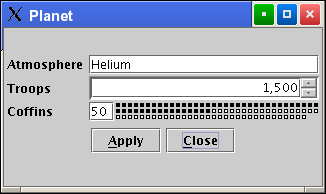
Property Sheets: Copy/Paste the Asteroid to a new piece. Name it "Planet" and use "planet.gif" for the Basic Pieceimage. Planets have extra bookkeeping information attached to them, for which we'll use the "Property Sheet" trait. Set the Menu Text to "Planetary Data", the Keystroke to CTRL-D and Commit changes on "Apply Button or Enter Key". Add one property named "Atmosphere" of type "Text," one named "Troops" of type "Spinner", and one of type "Coffins" of type "Tick Marks with Value". Save the piece and then select the planet and hit CTRL-D. You'll see a new window with the properties editor. Any values you type here will become the initial values whenever anybody drags a new planet onto a map.
