Eclipse setup
Setting up Eclipse for VASSAL development
Install the Java Development Kit (JDK)
The first thing you need is the Java Development Kit (JDK). Good news is it's free from Sun. This will install the Java compiler and libraries on to your system. If you are running VASSAL then you will already have the Runtime portion (Java Runtime enviromnet - JRE) installed but for programming you will need the full JDK.
Install Eclipse
Download Eclipse from http://www.eclipse.org/downloads/index.php . The link beside "Download Now" on that page should recognize your platform automatically. If it does not, select "Other downloads for x.xx" and choose the appropriate version there.
Once you have the file, simply unzip eclipse to a folder of your choice. Run the eclipse application to get started. You will want to create a shortcut to the application on windows, as eclipse does not install any of its own.
Hello World, in Eclipse
The first thing you will be asked to do is to select a workspace. For most users, the default workspace is fine, but feel free to change it. This is just the folder where eclipse will seach for projects.
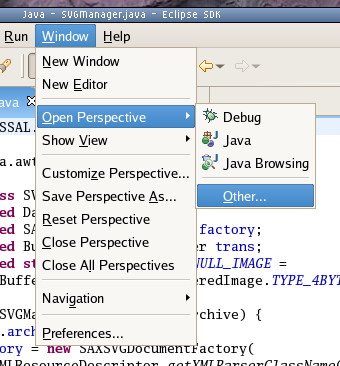
Once Eclipse has loaded up, go to window, open perspective, other... and choose Java. This sets up a default layout that presents elements useful for working with Java. To test that your prior installation of the JDK is working, go the File Menu, choose New -> Project, and use the Wizard to create a Java Project. In the left hand panel, choose the Package Explorer tab. If this tab is not visible, go to the Window menu, and choose Package Explorer under the Show View submenu. Rightclick on the Project Name, and choose New >Class, and create a class with a main method. In the Main method, call System.out.println("Hello World"); and then save the new class. In eclipse, your project is recompiled dynamically whenever you save a file. You'll notice that the bottom pane contains a Problems tab. If there are errors or warnings in any of your projects, they will show up here.
Assuming everything compiled fine, in the Package Explorer, right click on the class you created and choose Run > Java Application. In the console window, the words "Hello World" should appear. In the toolbar at the top, you'll notice a green arrow pointing right. You can use this button to run your application again, and if you have multiple applications to run, it has a dropdown menu to select recent apps. The "Run..." option allows you to set numerous parameters for running your applications, including commandline arguments.
There is a lot more to discover in Eclipse, including code completion, refactoring, and automatic source generation, CVS integration and organization. You'll need to poke around to discover what eclipse has to offer, but this little intro should get you off the ground.
Subversion, and Installing and Configuring Subclipse
As of October 2006, the VASSAL engine source code is stored in a Subversion (SVN) repository, rather than the previous CVS repository. For more information on Subversion, see the Subversion Book. The source code repository allows multiple developers to share source, coordinate changes, and manage releases.
To access the SVN repository from Ecplise, install the Subclipse plugin.
(Note for everyone: There are two SVN interfaces that Subclipse can use: JavaHL and JavaSVN. This setting is found under Window > Preferences > Team > SVN. If you get a 502 Bad Gateway error when trying to commit to the repository, you need to switch to JavaHL. For non-Windows systems, follow the instructions here.)
(Note for Linux users: If you're using an RPM-based Linux distribution, you may also need to install the java-1.5.0-sun-compat package from the JPackage Project in order for Subclipse to work properly, due to a conflict between GNU GCJ and Sun Java as described here. A side-effect of this package is the installation of the Bitstream Vera family of fonts, which might be listed in your /etc/fonts/fonts.conf higher in preference order than the fonts you're presently using. In order to avoid a change of system fonts, move the Bitstream Vera fonts to appear after your preferred fonts in the <prefer> blocks.)
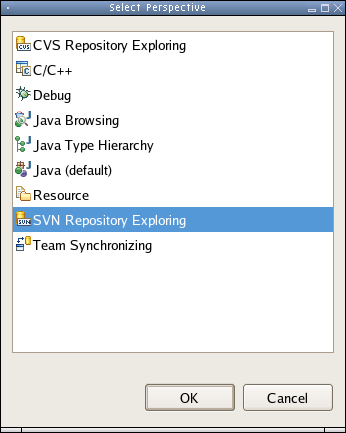
Once you have Subclipse installed, go to the "SVN Repository Exploring" perspective and create a new SVN repository definition:
After installing Subclipse, "SVN Repository Exploring" shoule appear in the perspectives list:
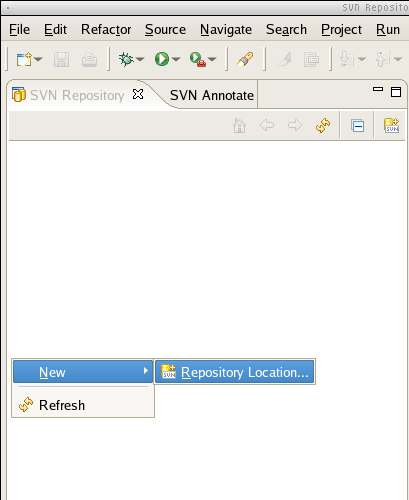
With the SVN perspective open, right-click on the SVN Repository tab to add a new repository location:
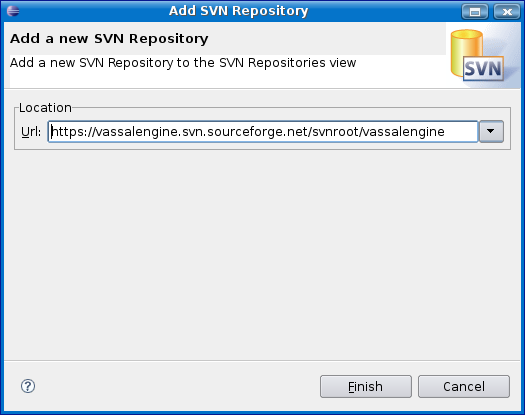
The URL for VASSAL's SVN repository is [[1]]: NOTE: repository is [[2]] now
Congratulations, you have successfully installed Subclipse and configured it for the VASSAL SVN repository.
Download source and create Java projects
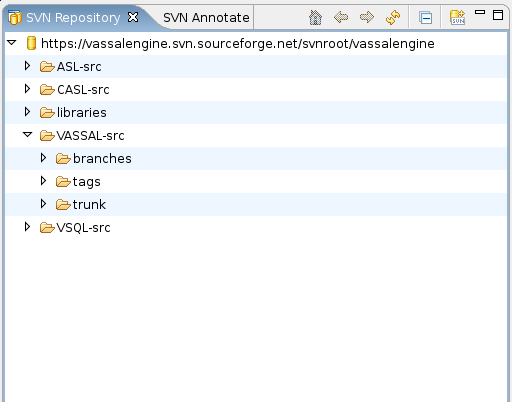
After selecting the repository, you will be able to explore the source tree:
At present, the repository is divided into the following subprojects:
- ASL-src - Source for VASL
- CASL-src - Source for VASL LOS Engine
- VASSAL-src - Source for VASSAL
- VSQL-src - VSQL components and other modules maintained by Brent Easton
If you are not interested in VASL and VSQL, then you need only checkout the VASSAL-src project. For VASL, you will need VASSAL-src, ASL-src and CASL-src. For VSQL, you will need VASSAL-src and VSQL-src.
Each project directory contains the directories trunk, branches, and tags, which we use to organize the source:
- trunk contains is the current source for the project.
- branches contains copies of the source which developers are modifying. E.g., branches/uckelman is the branch on which Joel Uckelman is working.
- tags contains snapshots of the code at various milestones, such as releases. E.g., tags/v2_6_3 has a copy of the source as it was when VASSAL 2.6.3 was released.
To check out the current source for a project:
- Right click on a project (e.g. VASSAL-src/trunk) and select 'Checkout...' Some information will be retrieved from the SVN repository.
- Select 'Check out as a configured using the New Project Wizard', and select the 'Java > Java Project' wizard.
- Give what you're checking out a name. It can be the same as the directory (trunk) or something more meaningful (VASSAL, Fred). Use the default for project contents location. Press 'Next >'
- Now you have a Java Settings tab with 4 different tabs a) Source tab. Select whatever it has there and click on Edit. Select 'Use Project folder' and save. Unclick 'Allow output folders for source folders' and change default output folder to 'xxxx/bin' where xxxx is the name of your project. This will cause all the generated classes to be created in the bin subdirectory rather than all over the place in the source folders. b) projects, libraries and Order and Export we will update later after all the projects are created.
- Press Finish and say Yes, you want the project to be associated with the Java perspective. This is vital for you to be able to use the project effectively.
- If you want to setup more projects (e.g., VASL, CASL, VSQL), repeat these steps.
Notes:
- If you install all everything, you should have four seperate projects. Now that these projects are associated with the Java perspective, they should all compile automatically when you switch to the Java perspective and you should get a gazillion errors becuase the three projects don't know about each other.
- In the CASL project, delete the VASL directory. This has an old copy of the VASLThread source which is also included in the VASL source.
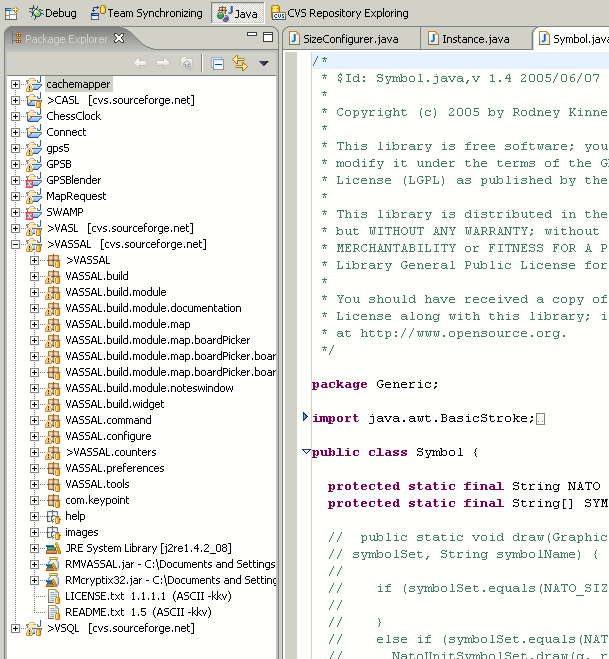
Once completed, you should have a Package Explorer that looks something like this:
Configure Projects
Next we need to relate the projects to each other and set up classpaths and source paths.
If you are not interested in VASL or VSQL, you will only need to download and configure the VASSAL (src) project.
You need to be in the Package Explorer window in the Java perspective.
Select each project in turn, right-click and select properties. We need to update the 'Java Build Path' and 'Project References' for each project. (NOTE: for VASL, CASL or VASSAL, use whatever you have called your three projects).
VASSAL project
- Java Build Path > Projects Tab: None selected
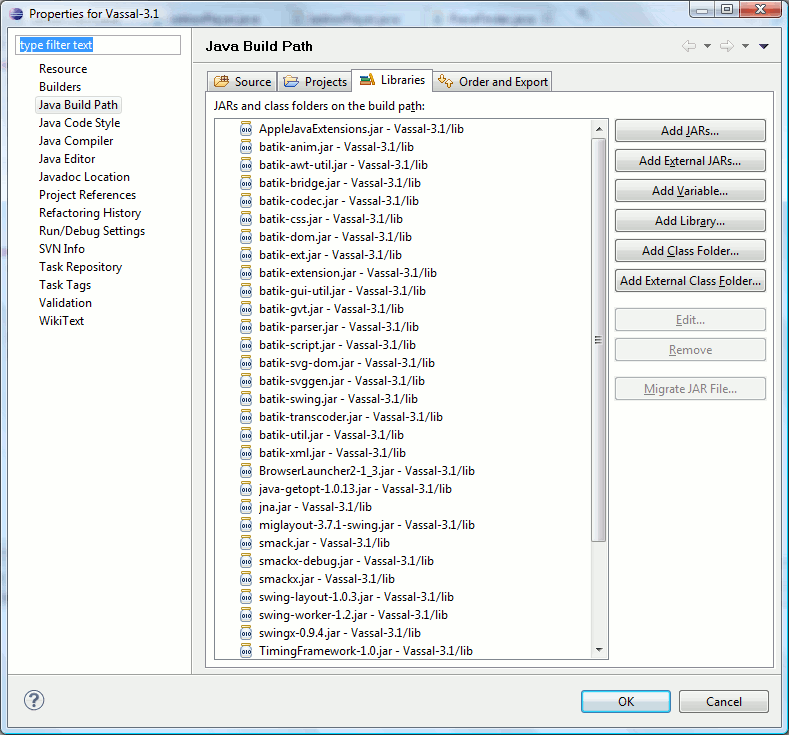
- Java Build Path > Libraries Tab: Click on 'Add Jars' and navigate to the 'lib' directory of the project you just created select all of the .jar files. Repeat but this time add all of the .jar files found in 'lib-nondist' directory of the project. As of Vassal 3.1.15, there are 61 total libraries to be included from both directories
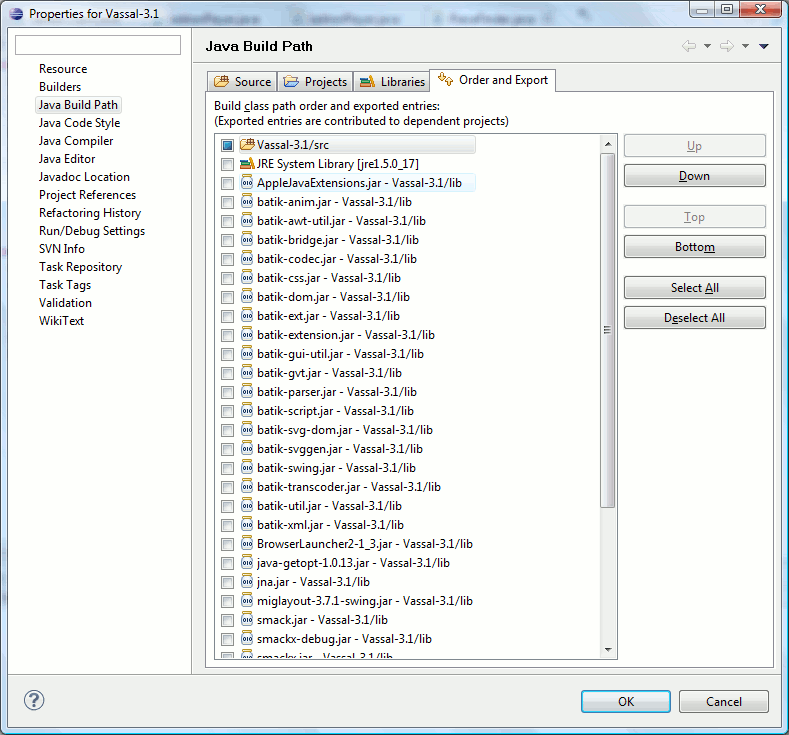
- Java Build Path > Order and Export Tab: make sure everything is selected. VASSAL project should be first, then the JRE, then the rest of the library jars.
- Project References: None selected
CASL project
- Java Build Path > Projects Tab: Click on VASSAL
- Project References: Click on VASSAL
VASL project
- Java Build Path > Projects Tab: Click on CASL and VASSAL
- Project References: Click on CASL and VASSAL
Run/Debug Configurations
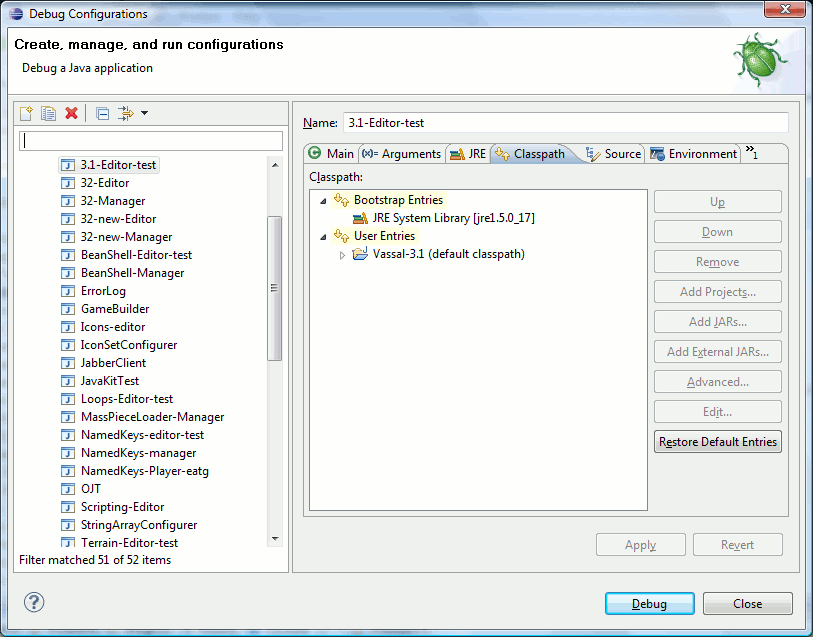
You can Run or Debug VASSAL under the control of Eclipse
Click on your VASSAL project and then Run -> Run as Java Application ...
In your run/debug configuration check the following tabs:
Main Tab:
Project: VASSAL
Main class: (Watch the spelling, case must match)
 For the ModuleManager: VASSAL.launch.ModuleManager
 For the Player: VASSAL.launch.Player
 For the Editor: VASSAL.launch.Editor
Select 'Include libraries when searching for main class'
Note that to be able to debug VASSAL itself, you must directly debug the Player or the Editor. You cannot debug a Player or Editor session that you start while debugging the Module Manager.
Arguments Tab:
No arguments for the Module Manager.
The pathname of the module surrounded by double quotes for Player.
--edit "pathname" for the Editor.
NOTE: --standalone is also needed for debugging the Player and Editor, or Vassal will report a bug.
In the VM Arguments: box add -Xmx256M to bump the Java VM memory allocation up to 256Mb (or -Xmx512M for large modules).
JRE Tab:
Use default.
Source Tab:
Should the single entry Default.
Checking in your code changes
Anyone has read-only access to the source code. To commit changes to the repository, you must be added as a developer to the SourceForge project. Send email to [| Rodney Kinney] to request to become a developer.
Public releases are built from the trunk branch. Developers should create their own branch for development and commit changes only to that branch. Please do not commit changes to the trunk branch.
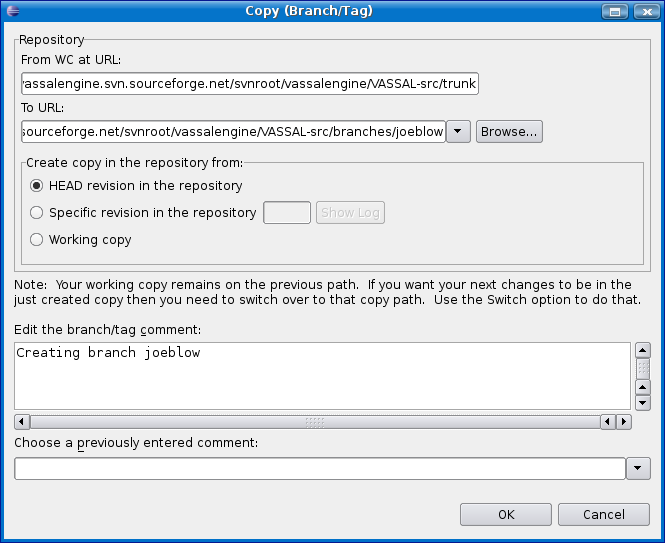
To create your own branch:
In the "SVN Repository Exploring" perspective, right-click on the trunk folder and select Branch/Tag. In the To field of the dialog, enter https://vassalengine.svn.sourceforge.net/svnroot/vassalengine/VASSAL-src/branches/<login> where <login> is your SourceForge login. Leave the From field pointing to trunk and use the HEAD revision.
Important Enter "Creating branch <login>" in the comments field. When synching your changes with other changes later, you will need to refer to the revision number at which you created the branch, and this comment is your only way of recording that revision number.
Now right-click on your new branch and select Checkout as above. If you already have a project created from trunk, right-click on the project in the Java perspective, select Team->Switch and select your new branch.
Once you have an Eclipse workspace based on your branch in the SVN repository, you may commit code changes freely.
Merging changes from trunk
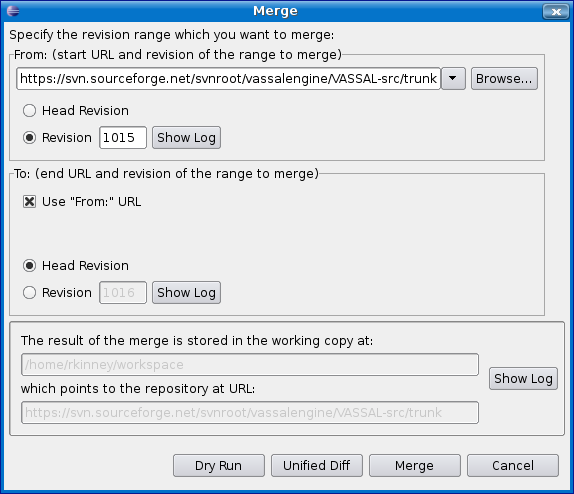
As you develop on your branch, you will want to periodically synchronize with changes to the trunk branch. To do so, right-click on your project in the Java perspective and select Team->Merge. In the From field, enter the trunk URL: https:svn.sourceforge.net/svnroot/vassalengine/VASSAL-src/trunk. For the revision, use the number of the revision at which you last synchronized with the trunk//. If this is your first time synchronizing, use the revision at which you created the branch. Use the Show Log button to find the proper revision number. In the To box, check the Use From: URL box and use the Head revision. This will bring in all the latest changes made to the trunk.
Important: Before merging, check in any changes to your branch by selecting Team->Commit. After the merge, do a build and sanity check, then commit once more. In the comments field, enter "Merging from trunk to <login>". You will need this revision number the next time you want to merge, and this comment is your best way of recording it.
Example: User joeblow has created his own branch and is merging in changes from the trunk. He selects Team->Merge and chooses the trunk as the From URL. He hits Show Log and selects the revision with the comment "Creating branch joeblow", number 898. He selects the To URL to be the same as the From and selects the Head revision. After examing the differences and resolving any comflicts, he commits the changes to his branch by selecting Team->Commit, entering the comment "Merging from trunk to joeblow". The resulting revision is number 1002. The next time joeblow wishes to merge from the trunk, he will select 1002 as the From revision number.
Getting your changes into a release
When you believe your changes are ready to be integrated with the main release branch, first synchronize with the trunk as described above, then send email to Rodney Kinney requesting that he merge your changes into the trunk. Rodney will perform the merge and your changes will go out in the next release.
