User:Doggo
My project is a Vietnam based game that uses the GHQ Micro Armour (Modern) Rules with the GHQ Vietnam Supplement.
I am returning to VASSAL after a long-time away and have completely forgotten how to use the system. I thetrefore consider myself a complete Newbie and will be starting from scratch. Hopefully this page will chart my progress and help others who are faced by the same problem - I want to use VASSAL but don't know how?
In brief, I will require the following;
1. The rule book and supplement
2. A Module containing:
    i.   A map
    ii.  Counters for the combatants
    iii. Markers for use in play
    iv.  Game aid charts
3. A lot of patience and perseverance
4. Help from experienced VASSAL module designers!
I already have the Rule Book and Vietnam Supplement. These can be obtained direct from GHQ[1] or, in the UK, from Magister Militum[2].
Create a New Module
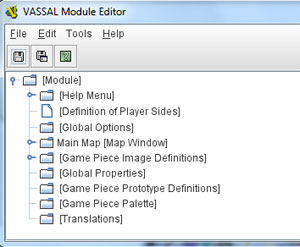
The first thing I need to do is create a VASSAL module.
1. Start VASSAL
2. Select File > New Module
Now for some Module details.
1. Double Click on 'Module' and you will have a new window with three input boxes; Game Name, Version Number and Description.
2. Fill in these boxes. My inputs are;
   i.   Game Name: Search & Destroy
   ii.  Version Number: 0.1
   iii. Description: 1st Air Cavalry mission in the Central Highlands of Vietnam 1965
A note about Version Numbering: it is a good idea to regularly save your module and every now and then, after a reasonable number of changes, to resave as a different version number. This way, if things go terribly wrong, you can always revert back to the previous version.
Creating a Map
To create a map you will need some third-party software such as Adobe Photoshop, Paintshop Pro or The Gimp (which happens to be a free application available from GIMP [3]. I personally use Photoshop and any instructions given here relate to that product..
I assume that there are many different ways of producing a map for VASSAL. However, I have been frustrated by the lack of documented information on how to do this so I have had to devise my own methods. I cannot guarantee that this is the 'right' way to do it but it has worked for me so far.
A VASSAL map is simply an image that you have produced in your graphics program (Photoshop, Paintshop Pro or The Gimp) and which is added to your VASSAL module. You then use VASSAL to overlay the map with a hex grid and, if you want, hex numbering.
Before creating my map I did a bit of background work primarily involving the games ground scale. In GHQ Micro Armour Modern (GHQ MAM) the ground scale is 1"=100meters/yards. Figures and vehicles are based on stands that are 1" square or, to scale, they occupy a 100meter by 100meter area of ground. Since I want to use a hex-based system on the map it seemed appropriate to designate a single hex as representing an area occupied by a single stand i.e. 100meters wide.
Since your map image is to be produced in pixel measurements you need to consider a couple of things. The size of the hexes in pixels will be dictated by the pixel size of the game counters since these need to fit inside the hexes.
When you add a hex-grid in Vassal there is a default hex size and I have decided that my infantry unit counters will be a standard 55-pixels square in order to fit inside a standard hex. This means that the ground scale on the map is 1-hex equals 100-meters/yards.
The GHQ Vietnam Supplement provides a handful of scenarios and each is accompanied by a map. GHG MAM is primarily designed for use with miniatures and to be played out on a wargames table. The most common measurements for these tables are 4-feet by 4-feet, 6-feet by 4-feet or any other combination in square-feet. Our map for VASSAL will be a graphical representation of these tables. Since we know the ground scale and we know the size of the hexes that we are going to be using it is necessary to work out the pixel size of our required map. For eample;
A 4-feet by 4-feet table is 48-inches by 48-inches. Therefore our map needs to be 48-hexes by 48-hexes. The size of a Vassal default hex is 64-pixels high by 55.425-pixels wide (approximately). Therefore we are going to need to create a map image that is (48 x 64-pixels)high and (48 x 55.425-pixels) wide. Our map image is therefore going to be 3072-pixels by 2660.4-pixels. We will round this up to 3100-pixels wide by 2700-pixels high.
By a quirk of fate - and a reason for my attraction to GHQ MAM - the scenario maps are presented as hex-based.
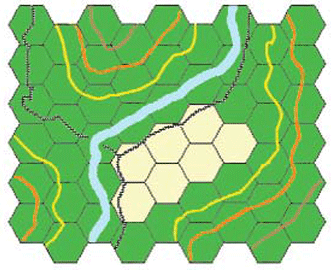
This is the GHQ map of LZ X-Ray (the scenario is available in the public domain from the GHQ site [4]).
The map represents a table that is 2-feet by 3-feet and each hex on the GHQ map is actually 4-inches across (i.e. each hex is 4-times larger than what I want). To reproduce this map I will need to create an image that (24 x 64-pixels) high and (36 x 55.425-pixels) wide(remember, one hex on our map equals 1" in game scale) or 1536-pixels wide by 1995.3-pixels wide. I rounded this up to 1600-pixels by 2000-pixels.
So, we have the pixel dimensions of the map-image that we will create in our graphics program.
However, before we go ahead and create a map-image of that size we need to create a couple of transparent overlays. These will act as "guides" for when we are filling the map with terrain and other features.
Our first overlay will represent the hexes shown on the GHQ map itself, i.e. each hex is equal to 4". We can use this to overlay our map and see how the hex-grid on the GHQ map can be represented over our image.
   1. Open your Vassal module.
   2. Expand the "Main Map" tab
   3. Right-click on the "Map Boards" tab
   4. Click on "Add Board"
   5. Leave "Board Name" blank
   6. Leave "Board Image" as NULL
   7. Enter 2000 in "Board Width"
   8. Enter 1600 in "Board Height"
   9. Leave "Background Colour" as NIL
   10. Click on "OK"
We are now going to create a hex-grid over this map board.
   1. Expand the "Map Board" tab (you will then see a tab called "Board"
   2. Right-click on the "Board" tab and select "Add Hex Grid"
   3. Change "Hex Height" to 256 (this is four times the standard hex-size). The hex-width setting will automaticaly change.
   4. Put a check-mark in the "Show Grid" box.
   5. Click on "Edit Grid"
IGNORE ALL TEXT THAT FOLLOWS - IT NEEDS EDITING: I have found a different and easier way of producing the map (as above) so that what follows is now no longer valid.
Using Photoshop to create an image of this size results in a file size of 705Kb. However, once this is saved for web use as a GIF or PNG file this file-size is considerably reduced - saving my Photoshop file as a GIF reduced the file-size to just over 10Kb, a significant reduction!
The image required for this map will therefore be (26.25 x 80 pixels) by (37.25 x 70 pixels) or 2100 x 2590 pixels.
The dominant terrain feature is Forest (green) and so I will use this as the background colour for my map image.
In your graphic software create a new image 2100 x 2590 pixels with a suitable green background. Save this image as LZXRayBoard.gif into your project folder.
Now we have a base map, we are going to need a couple of hex-grid overlays.
The first overlay will be a hex-grid (we shall call it 'Large hex-Grid') the same size as that shown on the map in the supplement.
The second hex-grid (we shall call it 'Small Hex-Grid') will fit inside the larger grid so that each large grid-hex is as wide as four small hexes on the small hex-grid.
I have been unable to find a method of creating a hex grid using Photoshop and have had to revert to using The GIMP to create the hex-grids. You will need to obtain the hex-grid script for GIMP and install it. It is available from The Gimp Plugin Registry [5].
Using The GIMP to create the hex-overlay - still to be written
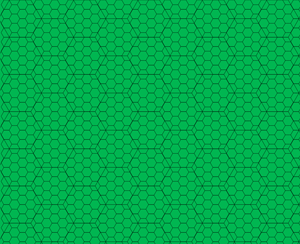
Once these overlays (in Photoshop they are called 'layers') are superimposed over your Baseboard you will have the following:
Save a GIF image of your baseboard with the small hex-grid overlay displayed and the large hex-grid overlay hidden. We are now going to create a map hex-grid in VASSAL to match the overlay. By using the VASSAL hex-grid we will be able to add hex-numbering to the map.
(Note: I changed the value of the green background as it was too dark I changed it to RGB 172:211:115 which is a bit lighter.)
Open your VASSAL Module in EDIT mode.
Expand the Main Map [Map Window] tab to reveal the [Map Boards] tab.
Right click the Map Boards tab and select 'Add Board'
Give the Board a name (such as 'LZ X-Ray')
Click on the 'Select' button next to 'Board Image'
Browse to the map image that you saved (the one of the baseboard with the small hex overlay) and select it.
Then click on the OK button.
The default board for your module is now selected - we will be changing this later.
You will notice that the Map Boards tab can now be expanded. Expand it and you will see a new tab called 'LZ X-Ray [Board]'.
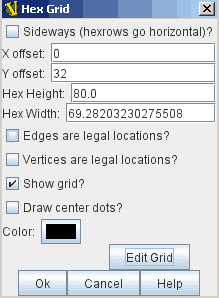
Right click on this new tab and select 'Add Hex Grid'
Change the settings to the following:
Now click on the 'Edit Grid' button.
You will see your map (with the small hex-grid overlay) and superimposed over that will be the VASSAL generated hex-grid. Use the keyboard arrow-keys to line up the VASSAL hexgrid with the grid on your image so that they match perfectly.
Select 'SAVE'. You have now created a perfect hex-grid overlay for your map in the module. Since it perfectly matches the hex-grid overlay you can now use the overlay as a guide to the placement of terrain on your map.


