A Symbolic Dice Button places a button on the Toolbar which rolls dice that use graphical images to display their faces — in simpler terms, "dice that look like dice". A Symbolic Dice Button can roll one or more individual dice, each represented by a [Symbolic Die] component, each of which may in turn have any number of faces (represented by [Symbolic Die Face] sub-components). When the button is clicked, a random face is selected for each Symbolic Die that this component contains.
The results of the roll can be reported as text into the chat area, and/or graphically in a separate window and/or in the button itself.
A Symbolic Dice Button can be configured to play a sound when it is pressed.
A Symbolic Dice Button can also be configured to send one or more "hotkeys" or Named Key Commands when it is pressed, allowing other effects to be chained as well.
After the button is pressed, a property named <name-of-dice-button>_result will also contain the result, which can be referenced by other pieces and/or toolbar items. For example, if your dice button’s name is RedDie then the property RedDie_result will contain the result.
To add a Symbolic Dice Button to your module, right-click on the main [Module] entry at the very top of the Editor’s configuration window, and select Add Symbolic Dice Button.
Then, once you do the initial configuration of its options, navigate to the [Symbolic Dice Button] component that will have been added at the very end of the Module’s list of components.
Right-click on the [Symbolic Dice Button] entry, and select Add Symbolic Die.
If you wish this button to roll more than one die, you can also add more.
Then, you will need to right-click each [Symbolic Die] entry, and select Add Symbolic Die Face once for each face of the desired die (so a 6-sided Symbolic Die would have six Symbolic Die Face sub-components). You can then configure each of the components and sub-components.
- Name:
-
The name of the dice button.
- Button text:
-
Text for the Toolbar button in the main window.
- Tooltip text:
-
Optional tooltip text for the Toolbar button in the main window.
- Button icon:
-
The image to display on the Toolbar button.
- Hotkey:
-
Keystroke or Named Command for rolling the dice.
- Toolbar button can be disabled by a property:
-
If this box is checked, you will be able to enable/disable the Toolbar Button by changing the value of a Global Property. See also: Toolbar Configuration
- Global Property to disable this button when "true"
-
The name of a Global Property that will control when this Toolbar Button is enabled or disabled. If the property contains the string true, the button will be disabled; if it contains any other value the button will be enabled.
- Button Icon when disabled:
-
If you select an alternative icon here, then that icon will be used when the button is currently disabled. If you leave the icon empty, then the normal icon, if any, will stay in place. Any button text for the toolbar button will be greyed out when the button is disabled, regardless of your choice in this field.
- Play a sound:
-
Select to play a sound clip when the button is activated.
- Sound Clip:
-
The Sound clip file to be played.
- Send hotkeys:
-
Select to send a list of Hotkeys to other components when the button is activated.
- Hot keys:
-
The list of Keystrokes or Named Commands to be sent.
Use the New button to add another key, or the Remove buttons to remove existing keys.
|
Note
|
Because these are Global Hotkeys rather than Global Key Commands, they are sent to Module and Map Toolbar components, not to individual Game Pieces.
Of course a Hotkey could be used to activate a Global Key Command component which could then affect individual Game Pieces.
|
- Repeat this set of actions (Loop):
-
Allows you to perform the specified actions multiple times.
- Type of loop:
-
Select the type of loop from the drop-down menu:
- Repeat fixed number of times:
-
This loop option allows you to repeat the set of actions a specified number of times.
- Repeat while condition is true:
-
This loop option allows you to repeat the set of actions while a Property Expression remains true.
If the expression begins the loop already false, the actions will not be performed at all (compare "until", below).
- Repeat until condition is true:
-
This loop option allows you to repeat the set of actions until a Property Expression becomes true.
The set of actions will be performed at least once.
- Loop how many times:
-
An Expression that defines how many times to generate the set of actions (for a fixed loop).
- Loop while/until condition is true:
-
Enter the Property Expression that controls how long to keep looping (for a while or until loop).
- Perform this Hotkey once before looping starts:
-
For all loop types, enter a Keystroke or Named Command that will be performed once before the looping process commences.
- Perform this Hotkey once after looping complete:
-
For all loop types, enter a Keystroke or Named Command that will be performed once after the looping process finishes.
- Create a loop index property?:
-
For all loop types, allows you to create a Property whose value will change as the looping process proceeds.
- Index property name:
-
The name of the property that will be created.
- Index property start value:
-
An Expression that sets the value of the index property prior to looping commencing.
The expression must evaluate to a whole number.
- Index property increment value:
-
An Expression that defines how much will be added to the Index Property at the start of each loop.
The expression must evaluate to a whole number.
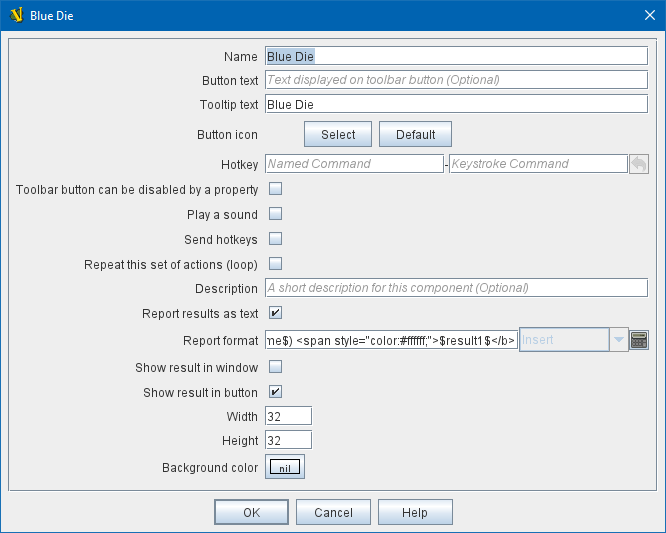
- Report results as text:
-
If true, report results to the Chat Log.
- Report format:
-
A Message Format specifying the format for reporting text results: $name$ is the name of the button as specified above, $result1$, $result2$, etcis the result of the 1st, 2nd, etc.
[Symbolic Die] component.
$numericalTotal$ is the sum of the numerical values of all the Symbolic Die rolls.
|
Note
|
as of Vassal 3.3.3 these reports can include HTML tags, including <img> tags to place dice images directly into the chat log (see example below).
|
- Show result in window:
-
If true, show the results graphically in a standalone window.
- Window title format:
-
A Message Format specifying the format for reporting results to the titlebar of the standalone window.
- Show result in button:
-
If true, show the results graphically in the toolbar button itself, by displaying the image of the appropriate [Symbolic Die Face].
- Width:
-
The width of the area for displaying results graphically.
- Height:
-
The height of the area for displaying results graphically.
- Background color:
-
The background color to be used when displaying results graphically.
|
|
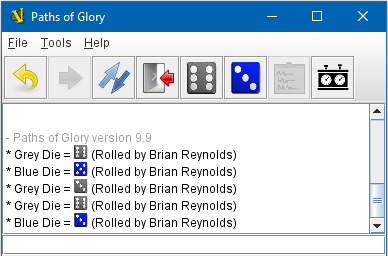
EXAMPLE - HTML with Dice: In the illustration below, a Symbolic Dice Button is configured to use HTML in its report format in order to display an image of the dice result in the chat log.
Notice how the tag <img src="d6-$result1$-grey.png" width="14" height="14"> uses the $result1$ value to index the name of a png file to be displayed.
Then, the width="14" height="14" portion forces the dice images to be scaled to the height of the text in the chat log.
Later, the <span style="color:#ffffff;">$result1$ section displays a text version of the numerical result, but in "white-on-white" text which will be invisible unless the text is selected to be cut-and-paste into another window, thus preserving the numeric value in case the chat log is cut-and-paste into a different application.
Example of a Symbolic Die configured to display dice images inline in the Chat Log. The $result1$ property is used to index the correct image filename.
Sub-Components
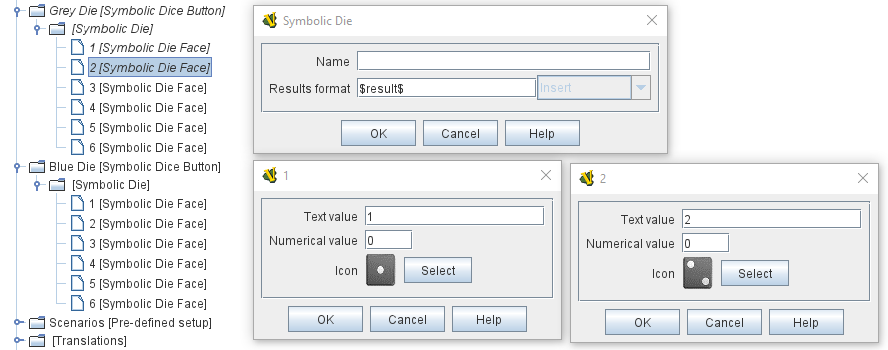
Symbolic Die
Once you’ve added a Symbolic Die to your Symbolic Dice Button (by right-clicking the [Symbolic Dice Button] component entry in the editor and selecting Add Symbolic Die), you can then right-click its own [Symbolic Die] component entry and select Add Symbolic Die Face.
You’ll need to add one [Symbolic Die Face] for each "side" the die will have.
So a traditional 6-sided die would of course need six die faces, though you can create dice with any number of faces desired, no matter how geometrically improbable!
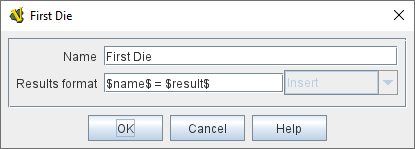
- Name:
-
The name of the die
- Results format:
-
A Message Format specifying how to report the result of this die roll.
The resulting text will be substituted for $result1$, $result2$, etc in the Symbolic DiceButton’s results format: $name$ is the name of this die as specified above, $result$ is the text value of the Symbolic Die Face that is rolled, $numericalValue$ is the numerical value of the Symbolic Die rolled.
|
|
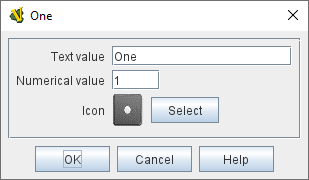
Symbolic Die Face
Each die face contains a text value, a numerical value, and an image.
- Text value:
-
A text representation of the Face to be used in reports.
- Numerical value:
-
A numerical value of the Face to be used in totalling results.
- Icon:
-
The image to use for the Face.
|
|