VASSAL Reference Manual
Home > Module
Module
The Module is the top component in the Editor Configuration Window. Its properties are simply the name of the game, a version number, and a description. These properties are each displayed separately their own columns when the module is listed in the Module Manager that appears when Vassal starts up. The version number is used to warn users who attempt to load save files created by a later version of a module into an earlier one.
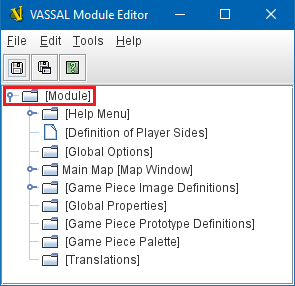
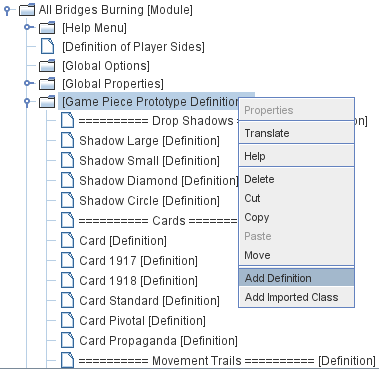
All additions and modifications to a module are done through the Configuration Window, also frequently referred to as the Editor window, which is a familiar file/folder type browser in which each file/folder represents a module Component. The second illustration on the right shows the Editor’s configuration window for a "Brand New Module", with all of the Components that are added by default. Right-click on the [Module] to get a context menu with options for the many types of Components you can add to a Vassal module, including maps, charts, and palettes full of game pieces. The components and pieces will in turn reference Properties and Expressions that determine how they operate. See below for more details on individual types of component.
Module Window
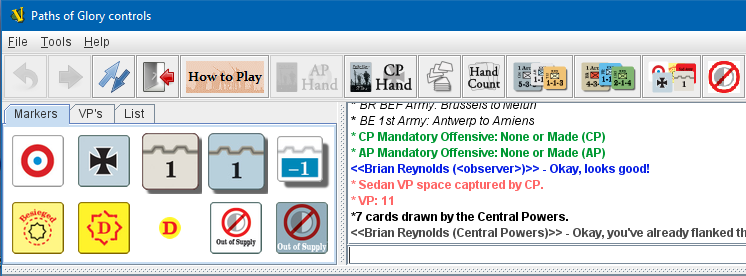
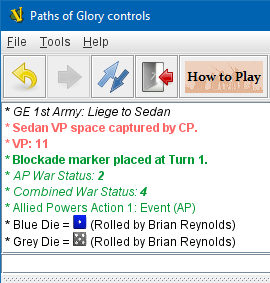
The illustration below shows the main Module controls window during play, including the Toolbar, a Game Piece Palette, and the Chat Log. The mapboard would appear below it.
Module Properties
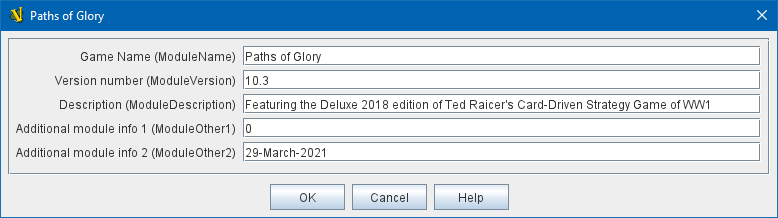
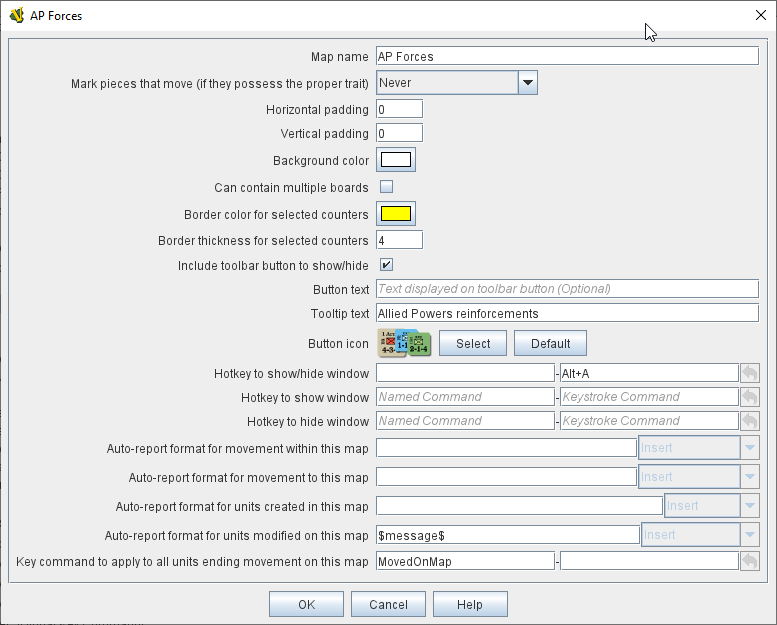
Double-clicking the [Module] component in the editor (or right-clicking and selecting "Properties" from the context menu), the module properties dialog will appear (see example below). Here you should enter the name of the game your module implements. You can also enter a version number, a description, and optional additional information that you wish.
Any of these properties is visible to the module itself as a Global Property, so for example you could refer to the module version number in a Message Format as $ModuleVersion$.
Editor Window
The Editor window (shown below with the [Module] component highlighted) lists the module and all of its components. Right-click on the [Module] to get a context menu with options for the many types of Components you can add to a Vassal module, including maps, charts, and palettes full of game pieces. See below for more details.
Toolbar

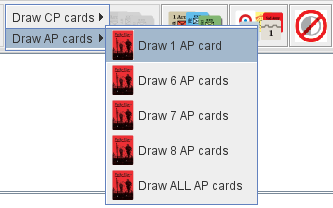
The Toolbar of the main Module window contains buttons for basic functions such as Undo, Step Forward, and Server Controls, but you can also configure buttons to roll dice, add pieces to the map, display charts and maps, keep player hands and reinforcement pools private, and more.
Buttons for basic functions are created by configuring the existing basic components of the module, such as Global Options and the Definition of Player Sides.
Buttons for Maps, Charts, Dice, and other additional buttons are created by adding new Sub-Components to the Module.
Chat Log
|
Every game module contains exactly one Chat Log, and it always appears in the main Module window just underneath the toolbar. It exists by default and cannot be removed in the Editor. The chat log not only allows players to "chat" with each other by typing messages into the lower text line, it also displays a running "log" of game events — messages produced by Report Action traits and other Message Formats in traits and various module components. Messages from your components can be displayed in a variety of colored, bold, and italicized fonts, as the chat log provides substantial HTML support to create a visually attractive and easy-to-read report log. |
Sub-Components
A proper module consists of many different types of subcomponents. Any of them can be added by right-clicking on the [Module] component in the Module Editor (the very top entry in the editor) and then selecting the appropriate Add option. |
|
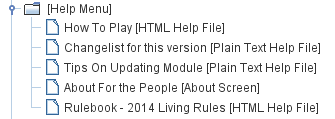
Help Menu
Every module has a Help entry on the main menu of its control window. Only one Help menu is allowed, and it may not be removed. See the full article for details on how to add items to the Help Menu. |
|
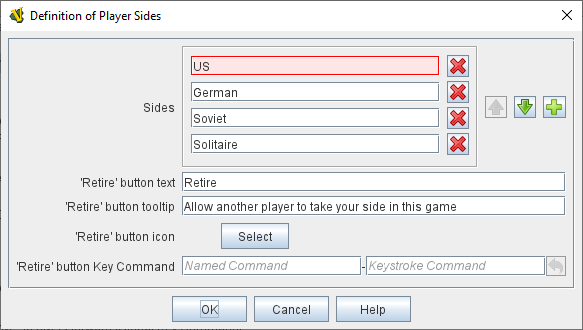
Definition of Player Sides
|
There is no requirement to define player sides for a module. If you define no sides, then all windows and all game pieces are visible and accessible to all players. If you wish to create components that are available only to one side in a game (e.g. a Private Window), you must define the player sides here. Simply type a name for each side and refer to that name in the restricted component(s). Only one player may be assigned to a side. When joining a game, players will be prompted to take one of the remaining available sides. Any number of observers (players who belong to no side) are allowed. The Retire or Switch Sides button, in the main controls toolbar, allows a player to relinquish their side (making it available to the next player joining the game). You can specify the text, icon, and mouse-over tooltip for the toolbar button. The Switch Sides component includes hot-seat support. Vassal will determine the next side in order, excluding non-player sides "Solo", "Solitaire", "Moderator" and "Referee". |
Global Options
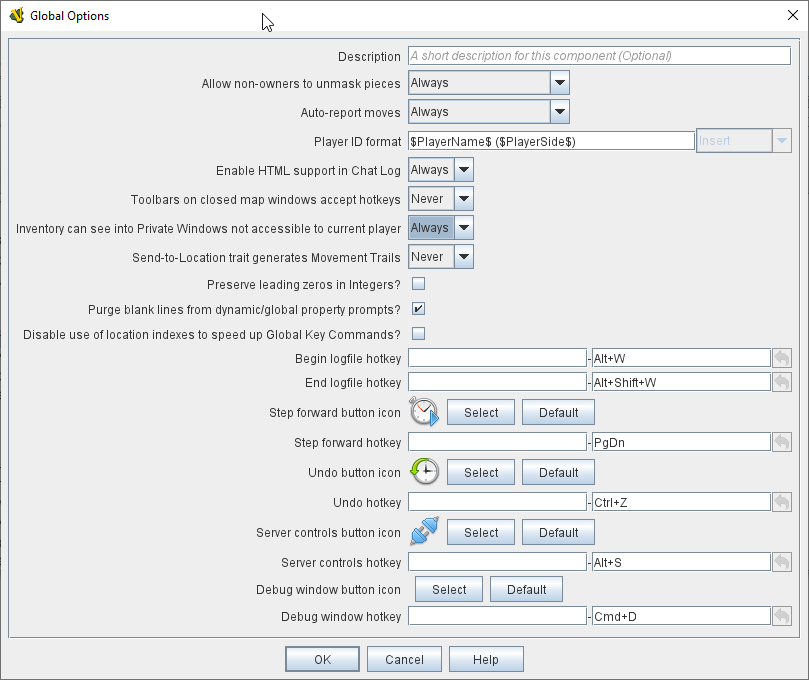
A set of options that apply to the module overall. Every module will have one Global Options entry; it can be edited but cannot be removed. The Global Options component allows you to define your own custom preferences for a module. It also contains other settings that apply to the module as a whole, as well as providing a location to configure button images and hotkeys for some of the basic Toolbar buttons. If an option has a Use Preferences Setting choice, selecting it will add an entry to the Preferences window to allow players to choose their own setting at game time. |
|
Map Window
|
A Map Window contains the main interface for playing games with VASSAL. It displays the playing surface on which the players move Game Pieces by dragging and dropping with the mouse. It is possible to have two or more Map Windows; the players may drag and drop pieces between the different windows. A Map Window should be configured with at least one Board (in the "Map Boards" component). A Map Window is most commonly used to display a Board on which pieces can be moved, although Map Windows can also be used to display e.g. reinforcement cards, charts and tables, and so forth. By default, every module has one Map Window, although it may be removed and others added. There are also specialized Map Windows, called Private Windows and Player Hands to contain pieces that are private to one player or side. |
Game Piece Palette
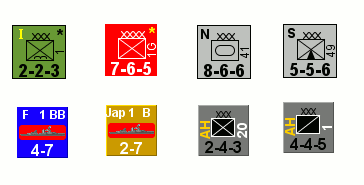
A Game Piece Palette allows an unlimited supply of new pieces to be created and added to the game. Some modules use them exclusively to create pieces whose supply is not limited by the game rules (e.g. control markers); other modules provide palettes from which any type of piece can be created so that players and designers can use them to set up game scenarios. By default, every module has one Game Piece Palette, although it may be removed and/or more may be added. |
|
Game Piece Prototype Definitions
|
Game Piece Prototypes allow you to define sets of commonly-used traits for various types of Game Pieces. For example, you could give all of your cards a particular back and a key command to send it to the discard pile, without having to cut-and-paste those traits into every single one of your cards. This also has the advantage of allowing you to change these traits in one place and have the changes affect every one of the pieces assigned to the Prototype. |
Global Properties
Allows you to define default numeric or string values for Global Properties which can then be referenced and modified by traits in your Game Pieces. Global Properties work much like "global variables" in programming, in that they are accessible to any piece or component in your module. |
|

Toolbar Menu
|
Groups buttons in the Toolbar into a single drop-down menu. Each button named in this component will be removed from the Toolbar and instead appear as a menu item in the drop-down menu. |
Multi-Action Button
Combines multiple buttons in a Toolbar into a single button. The named buttons are removed from the Toolbar and a new button is added. Clicking this button automatically invokes the actions of all the other buttons in the order given. |
|
Action Button
|
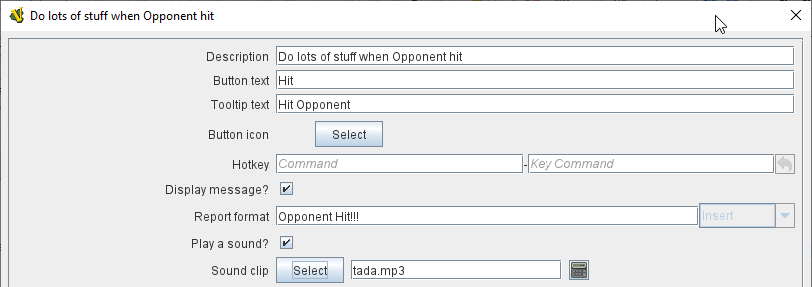
A Toolbar button that displays a message, plays a sound, and/or sends Hotkeys. An Action Button component places a button on the Toolbar of the main Module window which combines a number of different actions into a single button. When the button is clicked, or receives its Hotkey, it can display a message to the Chat Log, Play a sound, and/or send a list of KeyStroke or Named Commands to other components. |
Turn Counter
Creates a Toolbar item that can be used to track the current game turn and phase. A Turn Counter places a button and/or widget on the Toolbar of the Module window which keeps track of the current turn/phase/sub-phase, etc. of a game. Players can advance the turn forward or backward, or optionally jump directly to a turn. |
|
Game Piece Image Definitions
|
Allows you to build your own layouts and images for simple game counters without the need for an external art tool. Within the Game Piece Image Definitions you can build your own images by combining text, images, and standard NATO symbols. Images defined in this component will appear in the drop-down menu for selecting images for any Trait of any Game Piece just like an imported GIF, JPEG, or PNG. |
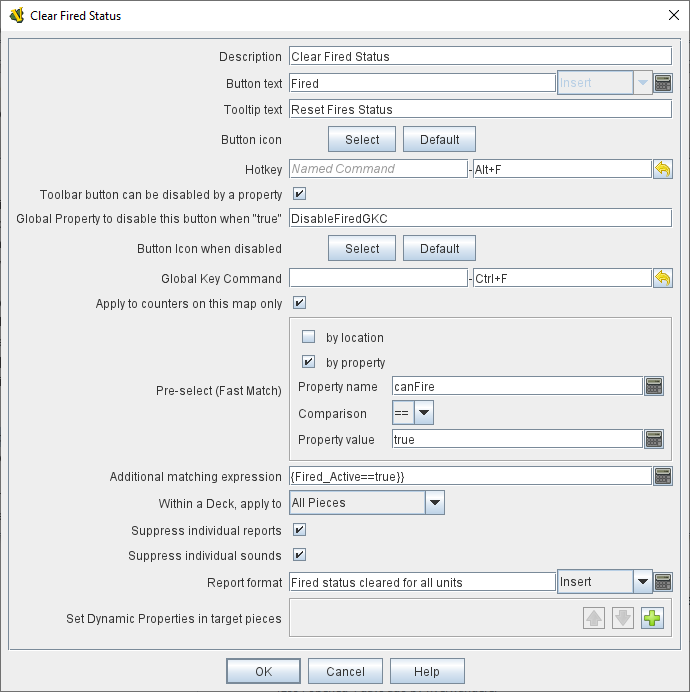
Global Key Command
Creates a button on the Toolbar that applies a given Keystroke or Named Command to many Game Pieces across all Map Windows. |
|
Startup Global Key Command
Can print a welcome message, or perform some other task that needs to be done whenever the module is started up.
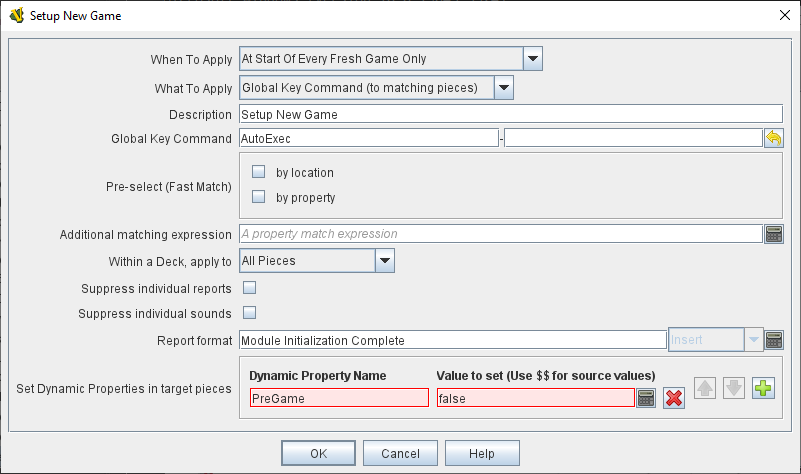
An extension of Global Key Command that fires automatically upon completion of module load, once all the key listeners are started up. All fields behave identically to the corresponding ones in Global Key Command, except that those pertaining to the physical representation of a Toolbar button are suppressed as being inapplicable.
See the Global Key Commands page for more details.
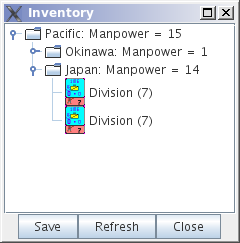
Game Piece Inventory Window
|
Creates a Toolbar button that will open a window which summarizes the pieces in the current game. You can define exactly which pieces are included in the window and howthey are organized. Can be configured to select a particular subset of pieces and to organize them by their properties. |
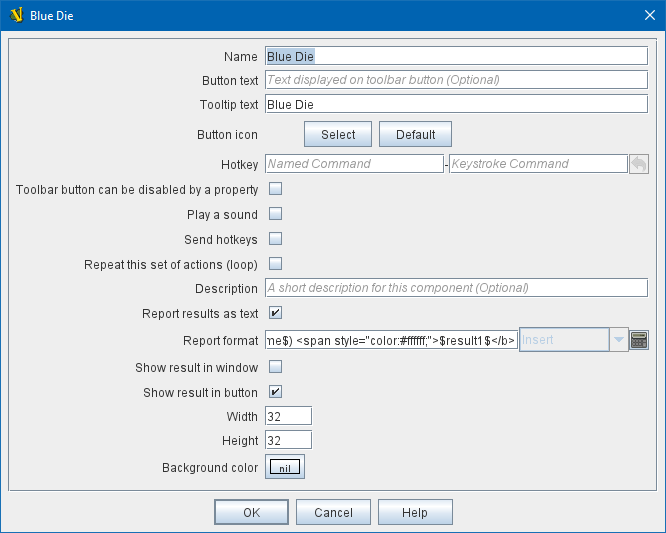
Symbolic Dice Button
Rolls dice whose faces are represented by graphical images. A Symbolic Dice Button places a button on the Toolbar which rolls dice that use graphical images to display their faces — in simpler terms, "dice that look like dice". A Symbolic Dice Button can roll one or more individual dice, each represented by a [Symbolic Die] component, each of which may in turn have any number of faces (represented by [Symbolic Die Face] sub-components). When the button is clicked, a random face is selected for each Symbolic Die that this component contains. The results of the roll can be reported as text into the chat area, and/or graphically in a separate window and/or in the button itself. |
|
Dice Button
|
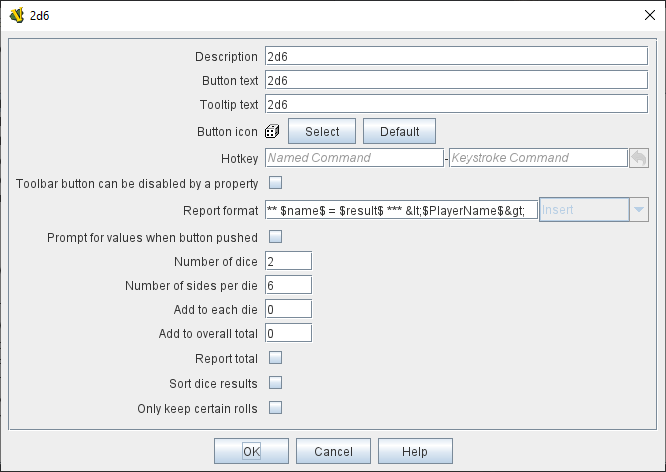
A Toolbar button to generate random numbers in the Chat Log. You may add any number of buttons. Each button will roll a specified number of dice with a specified number of sides and report the result in the Chat Log. |
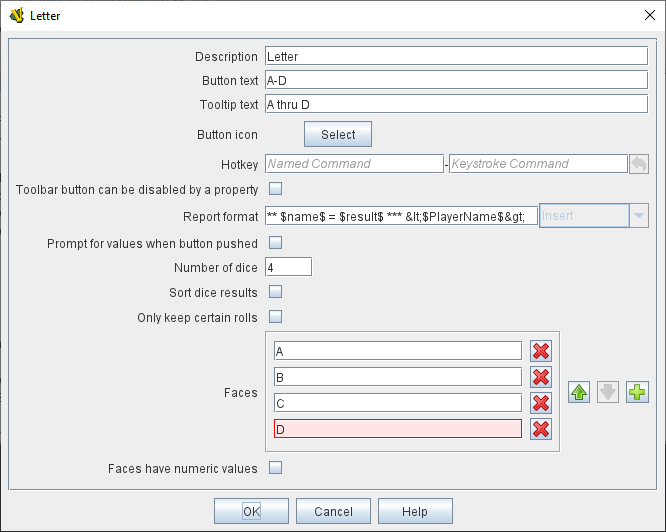
Random Text Button
A Random Text Button can be used to randomly select a text message from a list defined beforehand. For example, a button can be defined to select a random letter "A" "B" "C" or "D". Enter each test message into the box to the left of the Add button and then click the Add button. It can also be used to define dice with irregular numerical values, such as a six-sided die with values 2,3,3,4,4,5. If the values are numerical check the Faces have numeric values box, which enables the Report Total and Add to each die options. |
|
Pre-defined setup
Replaces the New Game menu item in the File menu of the main Module window with a new menu item that loads a saved game which you specify in advance.
Example: Add a Pre-defined setup named "Play Scenario" to the module and check contains sub-menus. Then add another set of Pre-defined setups named 1939, 1940, 1941, 1942 to the first and select a saved game file for each one. Players may now select File→Play Scenario→1939 to load the 1939 scenario, etc.
|
|
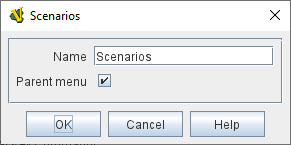
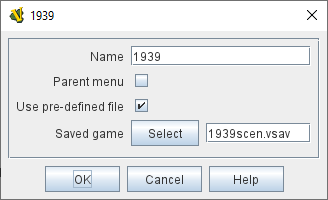
Chart Window
Adds a button to the Toolbar which opens a window for holding game play aids: charts, tables, etc. for player reference. |
|
Private Window
|
A Private Window behaves much like a normal Map Window, but is designated as belonging to a particular side or sides. This is particularly useful for holding a secret reinforcement pools. The owning sides must correspond to one or more of the sides defined in the definition of player sides. |
Player Hand
A Player Hand is a specialized Map Window for containing a hand of cards. It is designated as belonging to a particular side or sides. The owning sides must correspond to one or more of the sides defined in the definition of player sides. The main difference between a Player Hand and a Private Window is that in a Player Hand, the contents are automatically laid out in a row instead of stacking like counters. Like a Private Window, a Player Hand can only be manipulated by the owning player, and can optionally be completely hidden from other players. Cards can be manipulated in the hand (turned face up, etc.) and can be rearranged in order. Cards can be dragged into and out of the window to add/remove them from the hand. |
|
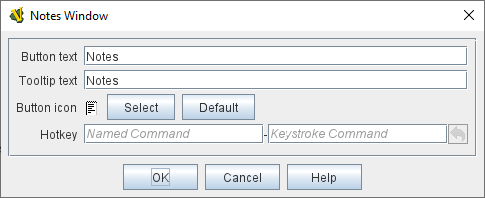
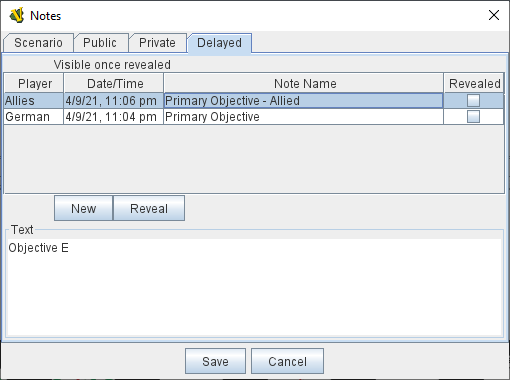
Notes Window
|
A window for saving text notes along with a game. A Notes button will be added to the Toolbar of the Module window, enabled when a game is started. Clicking the button displays the notes window. The Public tab contains notes that are visible to all players and to which all players may add. The Private tab contains notes that are visible only to the player who entered them. The Delayed tab is for writing messages to be revealed at a later time as a safeguard against cheating. To create a delayed message, hit the New button and enter a name and message text. Once created, the text of a message cannot be changed. At the appropriate time, the owning player may reveal the text of the message, at which point other players may read the contents of the message. |
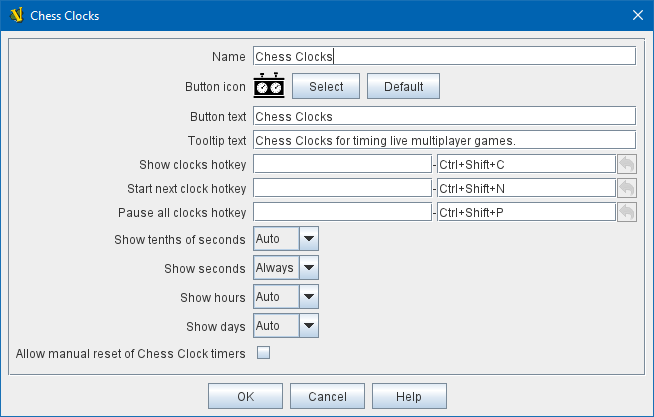
Chess Clock Control
Chess Clocks allow online multiplayer games to be timed. |
|