Mapmaking lesson 1
wiki > faq > Map Making > Lesson 1 > Page 1
Map Making - Lesson 1 - Creating and aligning your Grid
The first thing that I do is get a count of how many hexes the actual map has horizontally and then vertically. I then open up VASSAL and select "Create New Module". This is my template. I add a map and approximate the width and height that will be needed to accomodate the entire mapsheet. I do not add a scan, we want just a plain, white (off-white it actually is) background. I add a hex grid to the size of the hexes that I want to use, using black for the color (we can change this later) and making sure that they align just as they do on your actual map. You might as well get the hex numbering corrected at this point, but elect to not show it at this time.
Once you're satisfied with your blank map - it has enough horizontal and vertical hexes (it can run over a bit) and they are aligned properly, start a new game with this template and then export the map image as "hexgrid.png".
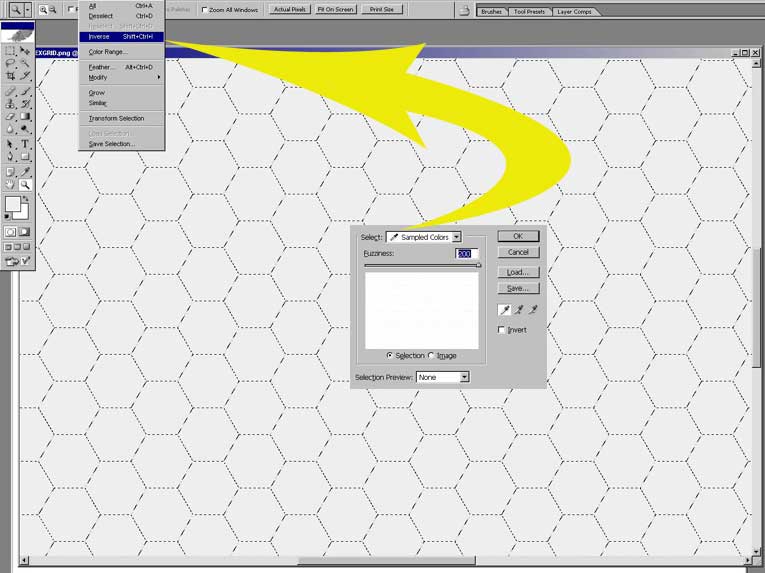
Now, the fun begins. Open up your hexgrid.png in Photoshop. Go to SELECT > COLOR RANGE and with the eye-dropper, click on the white (again, off-white) background and not the hex grid. Now, you want the grid, so go to SELECT > INVERSE as in the screenshot below, noting the position of the "Fuzziness" slider (maxed out):
You should now have just the hex grid selected. Ctrl-C to copy that selection to the clipboard. Lets put this on a new canvas - what will become your map when finished. So, go to FILE > NEW, making sure that you select Transparent for the "Contents". Now, Ctrl-V to "paste" what you have saved onto that canvas. You should now have your black hex grid on a transparent canvas. Name this layer "HEXGRID".
CONTINUE TO PAGE 2
